News Catalyst
EURUSD spent the previous session on a round trip — a sharp flush lower followed by an equally sharp recovery back toward its key retracement target, as Forexlive noted in its technical review — exactly the two-sided, stop-hunting tape this strategy is designed for. That flush-and-reclaim pattern is the textbook signature of a liquidity sweep: resting orders below the range get taken out, the move fails to follow through, and the pair re-establishes direction from a cleaner base. The broader risk backdrop is doing the same thing to dollar demand from both sides — a CoinDesk report that IBM sees quantum computing nearing a commercial breakthrough and CNBC's coverage of Clear Street opening pre-IPO access to Databricks both point to continued risk appetite in US tech, which keeps capital flows — and therefore EURUSD — twitchy on an intraday basis without committing to a clean macro trend. There are no high-impact scheduled releases on today's economic calendar for the euro or the dollar, which removes the single largest gap risk from a 15-minute system: the day's range should be driven by order flow and positioning rather than by a data print, and that is the regime in which a low-lag trend filter earns its keep. The absence of a calendar event amplifies the setup rather than threatening it — but it also means any unscheduled headline out of Washington or Frankfurt will hit an unprepared book, so position size stays fixed regardless of how clean the chart looks.
Trade Summary
This strategy trades EURUSD on the 15-minute chart in the direction of a Hull Moving Average (HMA) slope, but it only takes the signal after price has first swept a prior swing extreme and failed to hold there. The core idea is simple: trade the trend that resumes after the liquidity grab, not the trend that gets faked out by it. A standard moving-average crossover system gets chopped to pieces on a 15-minute forex chart because it fires on every probe beyond the range; the HMA's reduced lag makes that problem worse, not better, if it is used alone. Pairing it with a Highest Price / Lowest Price sweep condition and a Candle Pattern confirmation turns that lag advantage into a genuine edge — you get an early entry, but only on bars where the market has already shown that the opposing side has been cleared out.
The system is directionally neutral: it takes both long and short signals, with a trend-strength filter modelled on ADX to keep it out of dead ranges, and ATR handling stop distance and position size. It is built for a market that trends in bursts rather than one that grinds in a single direction all day — medium volatility with visible intraday swings, which is precisely the EURUSD condition described above. It will underperform in a tight, low-range session where the HMA flips direction every few bars, and it will underperform in a runaway one-way trend where waiting for a sweep means missing the move entirely. The sweet spot is the two-sided, moderately volatile session.
The Anatomy of the Trade
The Logic: What Inefficiency Are We Exploiting?
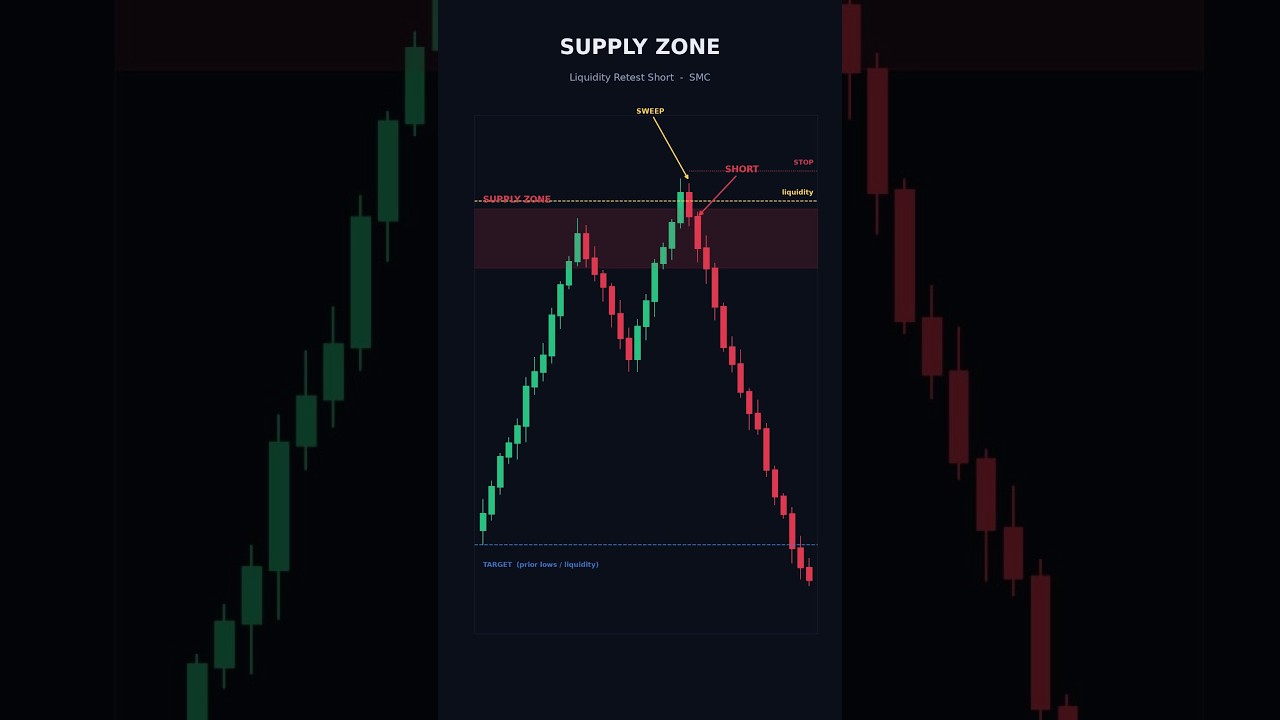
Retail stop orders cluster in obvious places — just beyond the last swing high and just beyond the last swing low. Larger participants need liquidity to fill size, and the cheapest liquidity available is exactly that cluster. The result is a recurring intraday pattern: price probes beyond a recent extreme, fills the resting orders, and then reverses because there was never any genuine directional interest behind the probe. The traders who bought the breakout are now offside, and their stops become fuel for the move in the opposite direction. This strategy does not try to predict the sweep — it waits for the sweep to be visible, then joins the resolution.
The edge comes from confluence between a fast trend read and a completed liquidity event. The HMA is deliberately chosen over an EMA because it responds within a bar or two of a genuine turn, which matters when the entry window after a sweep is short. But a fast filter alone produces noise, so the sweep condition acts as a gate: no sweep, no trade, no matter what the HMA is doing. The candlestick confirmation adds the final piece — a Morning Star or Bearish Engulfing close tells you the rejection has actually been paid for by real participants closing the bar back inside the range, not just a single wick that a stray tick produced. Each layer removes a different failure mode: the sweep removes trend-chasing, the HMA removes counter-trend fading, and the candle removes premature entries into a probe that is still in progress.
Setup Requirements
- Primary indicator: Hull Moving Average, period 21, applied to the close. Slope direction over the last 2 bars defines the permitted trade direction.
- Liquidity sweep: Highest Price / Lowest Price over a 20-bar lookback. The setup bar must trade beyond that extreme and close back inside it.
- Confirmation: Candle Pattern — Morning Star for longs, Bearish Engulfing for shorts, closing on the confirmation bar.
- Trend filter: ADX(14) above 20 — blocks entries when the market has no directional energy behind it.
- Risk management tool: ATR(14), used for both stop distance (1.5×) and position sizing.
- Primary symbol: EURUSD — the deepest, tightest-spread pair in FX, which means sweeps are genuine order-flow events rather than spread artefacts, and 15-minute bars carry enough participation to be meaningful.
- Timeframe: 15-minute. Fast enough to capture the post-sweep impulse while it is still running, slow enough that the HMA is not reacting to single-tick noise. Roughly 2–5 qualifying setups per week.
- Adaptability: The logic transfers to GBPUSD, USDJPY and major index CFDs, but the sweep lookback should be re-tuned per instrument — wider-ranging instruments need a shorter lookback to keep setup frequency usable.
Entry Rules
All conditions must align on the same bar or the setup is discarded — there is no partial-credit entry. The sweep must be recent (within the last 3 bars), the HMA must already agree with the intended direction, and the confirmation candle must close before any order is placed.
- Long entry: Price has swept the 20-bar low and closed back above it and the HMA(21) slope has turned upward with price closing above the HMA and ADX(14) is above 20 and a Morning Star formation completes.
- Short entry: Price has swept the 20-bar high and closed back below it and the HMA(21) slope has turned downward with price closing below the HMA and ADX(14) is above 20 and a Bearish Engulfing pattern completes.
Enter at the close of the confirmation candle. If the confirmation bar closes more than 1.0× ATR(14) away from the swept extreme, skip the trade — the move has already travelled too far and the reward-to-risk no longer works.
Exit Rules
- Stop loss: 1.5× ATR(14) from entry, placed beyond the swept extreme. If the swept high or low sits further away than 1.5× ATR, use the extreme itself plus a 2-pip buffer and reduce size accordingly.
- Take profit: Minimum 2:1 reward-to-risk — 3.0× ATR(14) from entry when the stop is at the full 1.5× ATR.
- Signal exit: Close the position if the HMA(21) slope reverses against the trade and price closes on the wrong side of the HMA, even if neither the stop nor the target has been reached.
The stop loss is non-negotiable and must be attached at entry, not managed manually. The entire premise of this strategy is that a failed sweep resolves quickly — when it does not, the read was simply wrong, and the only correct response is to take the pre-defined loss and wait for the next setup.
Risk Management
- Risk per trade: 1–2% of account equity. Use 1% while the strategy is unproven on your own data.
- Risk-to-reward ratio: Minimum 2:1. At a 2:1 payoff the system only needs roughly a 36% win rate to break even before costs.
- Position sizing: Size from the ATR-derived stop, never from a fixed lot. Worked example — on a $10,000 account risking 1% ($100), with ATR(14) at 12 pips the stop is 18 pips, giving 100 ÷ 18 = $5.55 per pip, or roughly 0.55 mini lots on EURUSD.
- Maximum concurrent positions: One EURUSD position at a time, and no more than two correlated USD positions across the book — correlated FX trades stack risk far beyond what the per-trade figure suggests.
SYMBOL:      EURUSD
TIMEFRAME:   15m

LONG ENTRY:
  Low sweeps below 20-bar Lowest Price, closes back above
  HMA(21) slope turns up AND close > HMA(21)
  ADX(14) > 20
  Morning Star pattern completes
             // Sweep must be within last 3 bars

SHORT ENTRY:
  High sweeps above 20-bar Highest Price, closes back below
  HMA(21) slope turns down AND close < HMA(21)
  ADX(14) > 20
  Bearish Engulfing pattern completes

SKIP IF:     Entry > 1.0 × ATR(14) from swept extreme

STOP LOSS:   1.5 × ATR(14), beyond the swept extreme

TAKE PROFIT: 3.0 × ATR(14) — 2:1 minimum reward-to-risk
             // Or exit early if HMA slope reverses

RISK:        1–2% equity per trade, one position at a time
Common Pitfalls
Most of the ways this strategy loses money have nothing to do with the indicators and everything to do with how the rules are applied under pressure. These are the five failure modes that show up most often in live trading.
Trading it through a dead range
When EURUSD settles into a 15-pip band, the HMA flips direction every few bars and price technically pokes past the 20-bar extreme constantly — but none of those probes are real liquidity events, because there was no meaningful liquidity resting there to begin with. The ADX(14) > 20 filter exists specifically to block this scenario, and disabling it during a quiet session is the single fastest way to turn this system into a losing one. If the filter is blocking every setup for hours, that is the strategy working correctly, not a reason to loosen the threshold.
Trading into an unscheduled EUR or USD headline
Today's calendar is clear, but EURUSD remains the most headline-sensitive pair on the board — an ECB speaker, a surprise trade announcement, or a Treasury comment can reprice it 40 pips in seconds. A sweep that occurs during a headline spike is not an order-flow event; it is a liquidity vacuum, and the reversal you are counting on may simply never come. Skip any setup that forms inside the first five minutes of a violent, news-driven candle, and stand aside entirely around scheduled central bank commentary.
Relaxing the confirmation requirement
The most common form of overtrading here is not taking too many trades — it is taking almost-valid ones. The sweep is there, the HMA agrees, ADX is fine, but the candle is a plain bullish bar rather than a completed Morning Star, and the trade gets taken anyway because three out of four looks close enough. Every condition removed from the entry stack roughly doubles the signal count while cutting the average edge per trade, which is a strictly worse business. Log the setups you skip; if the skipped ones consistently outperform, change the rules deliberately and re-test rather than improvising in the moment.
Over-optimising the lookback and HMA period
The 20-bar sweep lookback and the HMA(21) are round, defensible numbers — they are not the product of a parameter sweep, and they should not become one. It is trivially easy to find that a 23-bar lookback with an HMA(18) would have doubled last quarter's return on EURUSD, and equally certain that the improvement will not survive into the next quarter. If a parameter change only helps within a narrow band and degrades sharply on either side, you have found a curve fit, not an edge. Test parameter robustness by checking that neighbouring values produce broadly similar results.
Revenge trading after a run of sweeps that failed
Because this system waits for a specific confluence, losing streaks of four or five trades are entirely normal — and they feel worse than they should precisely because each setup looked textbook at entry. The temptation after a bad morning is to double size on the next signal to make it back in one trade. Position size must remain a fixed percentage of current equity regardless of recent results, which means size shrinks automatically during drawdown and recovers as equity does. Set a daily stop of three losing trades or 3% of equity, whichever comes first, and close the platform when it is hit.
Build Strategy using Arconomy
The EURUSD HMA Low-Lag Trend with Supply Zone Sweep Confirmation strategy is assembled entirely in the Arconomy Strategy Designer — no code required. Each rule below is dragged onto the canvas and wired into a Logic gate that only fires when the full stack agrees.
| Step | Rule(s) Required | Description | Key Configuration |
|---|---|---|---|
| Data | Price Data | Feeds 15-minute EURUSD OHLC bars into every downstream rule. |
|
| Entry | Moving Average | The Hull Moving Average is the primary signal — its slope defines the permitted direction and price must close on the correct side of it. |
|
| Filter | Highest Price & Lowest Price | Detects the liquidity sweep — price must trade beyond the recent extreme and close back inside it. |
|
| Filter | Candle Pattern | Confirms the rejection has been paid for by a completed bar, not a stray wick. |
|
| Filter | RSI (ADX modelling) & Logic | Blocks entries in directionless conditions, then AND-gates every condition so the trade only fires on full confluence. |
|
| Risk | ATR & Place Trade | Sizes the position from volatility rather than a fixed lot, so risk stays constant as conditions change. |
|
| Exit | Stop Loss & Take Profit | Attaches the protective stop beyond the swept extreme and the target at a 2:1 minimum reward-to-risk, with an HMA-reversal override. |
|
| Backtest | Validates the full rule stack across multiple EURUSD regimes before any capital is committed. |
|
Backtest Considerations
Test across a minimum of 12 months of 15-minute EURUSD data, and preferably 24 — at 2–5 setups per week, a six-month window produces too few trades to distinguish edge from luck. The sample must span genuinely different regimes: a trending stretch, an extended range, and at least one high-volatility policy period. A strategy that only performs in the trending slice is not a trend-following strategy with an edge, it is a trend-following strategy that happened to be tested during a trend. Run the sweep-lookback and HMA period across neighbouring values as a robustness check rather than an optimisation, and discard any configuration whose performance collapses one parameter step away.
Watch profit factor above 1.3, maximum drawdown, and the shape of the trade distribution. A profit factor that depends on two or three outsized winners is fragile — remove the top 5% of trades and check whether the system is still profitable. Track the maximum consecutive-loss run and confirm you can psychologically and financially absorb it; a system with five-trade losing streaks in backtest will produce longer ones live. The Arconomy backtesting engine reports all of these alongside the equity curve, so evaluate the curve's smoothness, not just its endpoint.
Cost assumptions matter disproportionately on a 15-minute FX system. Model EURUSD spread at 0.8–1.2 pips during London and New York hours and widen it to 2–3 pips for the Asian session and the daily rollover window — a backtest run at a flat 0.5 pip will materially overstate returns. Add at least half a pip of slippage on entries, since this strategy enters immediately after a volatile sweep bar where the book is thinnest, and assume worse fills on stops than on targets. If the strategy is only profitable at zero cost, it is not profitable.
Key Takeaways
- The edge comes from joining a trend after a liquidity sweep has cleared out the opposing side, rather than chasing the probe that creates it.
- Confluence is what makes the low-lag HMA usable — the sweep gate, the ADX filter and the candlestick confirmation each remove a distinct failure mode that the HMA alone would walk straight into.
- Risk is defined by ATR(14), not by a fixed lot size, with a 1.5× ATR stop, a 2:1 minimum reward-to-risk, and 1–2% of equity at risk per trade.
- Stand aside in low-ADX ranges, around unscheduled EUR or USD headlines, and whenever the entry sits more than 1.0× ATR from the swept extreme.
- Backtest over 12–24 months across multiple regimes with realistic spread and slippage — a system that only works at zero cost has no edge to trade.
Credits
The strategy idea originated from the following YouTube channel. Concepts have been adapted and structured for systematic implementation by Arconomy.
Dark Bull Capital's walkthrough shows how a supply zone is stripped of resting liquidity by a sweep immediately before the real move begins — the discretionary version of the setup automated here, with the channel's visual read of "sweep, then drop" translated into the mechanical Highest Price / Lowest Price sweep gate and HMA slope condition used in this post.